
A cracked pump casing, weld or shaft rarely announces itself. By the time you notice a leak, a weep of oil or a new vibration, the crack has often grown well past the part you can see. Repair only the visible section and the crack keeps travelling under your weld bead or epoxy patch, and the repair fails early.
Dye penetrant testing (DPT), also called liquid penetrant inspection (LPI) or simply PT, is the fastest and cheapest way to see the whole crack before you grind, weld or rebuild. This guide explains how it works, how to do it with a Magnaflux Spotcheck kit, and where it fits in a maintenance routine.
What is dye penetrant testing?
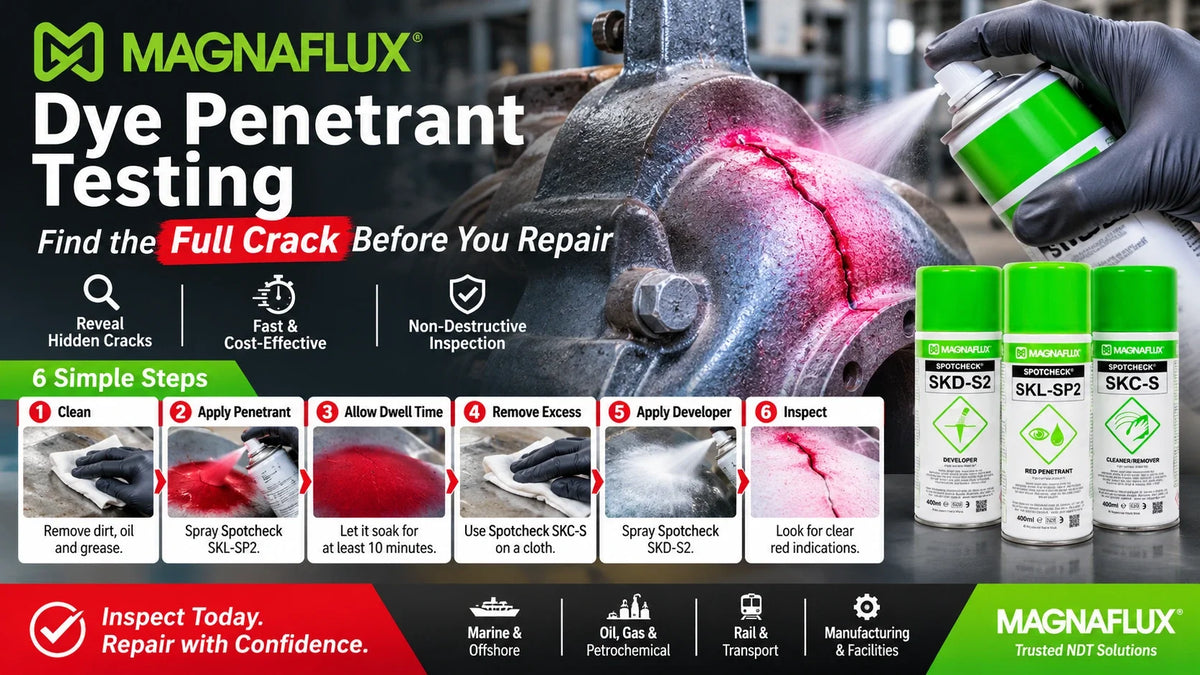
Dye penetrant testing is a non-destructive testing (NDT) method for finding flaws that break the surface of a part. A thin, brightly coloured liquid is sprayed onto the surface and drawn into any cracks by capillary action. After the excess is wiped off, a white developer is applied. It acts like blotting paper, pulling the trapped dye back out so each crack shows up as a sharp red line on a white background.
The method works on most non-porous materials, including steel, stainless steel, aluminium, brass, titanium, many ceramics and glass. It does not harm the part, needs no power supply, and a technician can learn the basics in an afternoon.
It does have limits. Penetrant only finds flaws that are open to the surface. It will not detect cracks hidden below the surface, and it does not work on porous materials such as unglazed ceramics or wood, where the dye soaks into everything. For subsurface defects, consider ultrasonic testing, or magnetic particle testing on ferromagnetic steels.
Visible vs fluorescent penetrant
Penetrants come in two main types:
- Type 1, fluorescent: the dye glows under a UV-A lamp in a darkened area. It is more sensitive and is used for aerospace and other critical parts.
- Type 2, visible (red dye): indications are viewed in normal white light. It is portable and easy to use, which makes it the usual choice for field work, weld checks and plant maintenance.
Penetrants are also grouped by how the excess is removed: water-washable, solvent-removable or post-emulsifiable. For on-site maintenance, a solvent-removable visible system in aerosol cans is the most practical choice. That is exactly what the Magnaflux Spotcheck range is.
How to do a dye penetrant test in 6 steps
- Pre-clean the surface. Remove paint, rust, scale, oil and grease from the test area and a little beyond it. Anything left in the crack mouth blocks the penetrant. Spray Spotcheck SKC-S cleaner, wipe and let it dry fully. Avoid heavy grinding or shot blasting just before testing, because it can smear metal over fine crack openings.
- Apply the penetrant. Spray Spotcheck SKL-SP2 red penetrant so the area is completely covered. Work within the product's recommended temperature range, which is roughly 4–52°C.
- Allow dwell time. Give the penetrant time to soak in. A 10-minute minimum is the generally accepted guideline. Tight fatigue cracks may need longer, and specific procedures can call for up to an hour.
- Remove the excess penetrant. Spray SKC-S onto a clean, lint-free cloth, never directly onto the part, and wipe gently until only a faint pink tint remains. Spraying remover straight onto the surface can wash penetrant out of the cracks you are trying to find.
- Apply the developer. Shake Spotcheck SKD-S2 well and spray a thin, even white coat from about 20–30 cm away. Thin is the key word: a heavy coat can hide fine indications. Allow it to develop, typically around 10 minutes.
- Inspect, record and post-clean. Examine the area under good white light. Mark and photograph any indications, then clean off all developer and penetrant with SKC-S before starting the repair. Residue left behind can weaken epoxy adhesion and contaminate welds.
How to read the results
- A sharp, continuous red line usually means a crack, for example a fatigue, heat, grinding or weld crack.
- Rounded red dots or clusters usually point to porosity or pinholes, which are common in castings and welds.
- A broad, blurry pink stain often means poor cleaning, a very rough surface or too much remaining penetrant. Clean the area and test again.
Penetrant testing shows a flaw's location and length clearly. It only hints at depth: a deeper crack holds more dye, so it tends to bleed out more widely.
Why you should inspect before you repair
A penetrant test adds about 30 minutes to a job and can save you from repeating the whole repair. It helps you:
- Find the true crack length. Cracks usually extend beyond what you can see with the naked eye, and the tips are where they keep growing. Mark both ends so your repair covers the full length. Many crack repair procedures also call for drilling small stop holes at each tip.
- Confirm the crack is gone. After grinding out a crack before welding or filling, test again to make sure nothing remains.
- Decide between repair and replacement. A short crack in a non-structural pump housing is a good candidate for epoxy repair. A crack through a load-bearing weld on lifting gear is a decision for an engineer.
- Verify the finished repair. Test welds again once they have cooled to catch any new cracking.
Once the crack is mapped and cleaned out, you can choose the right repair method. See our guides to Devcon Plastic Steel putty, epoxy vs welding for metal repairs, and how a corroded pressure vessel was repaired without welding.
Where dye penetrant testing is used
- Marine and offshore: weld seams, shaft keyways, rudder fittings and deck machinery.
- Oil, gas and petrochemical: pressure vessels, piping welds, valve bodies and heat exchanger tube sheets.
- Rail and transport: rolling stock components, brackets and fabricated frames.
- Facilities and utilities: pump casings, impellers, fan hubs and chiller components.
- Workshops and manufacturing: incoming inspection of castings and forgings, and quality checks on new welds.
Safety and good practice
- Spotcheck aerosols are flammable. Work in a well-ventilated area away from sparks and open flames.
- Wear chemical-resistant gloves and eye protection.
- Do not use SKL-SP2 on plastics, because it can stain, soften or dissolve them.
- Use penetrant, remover and developer from the same product family. This keeps sensitivity consistent.
- For code, aerospace or other critical inspections, follow the specified procedure, for example ASTM E165 or E1417, and have the work done by certified NDT personnel.
Get Magnaflux Spotcheck products in Singapore
Hong Teck Hin stocks the Magnaflux SK-3 Dye Penetrant Testing Kit. It includes SKL-SP2 penetrant, SKD-S2 developer and SKC-S cleaner.
Need bulk quantities, or advice on the right repair product once you have found the crack? Email sales@hongteckhin.com.sg or call +65 6294 3600.
Frequently asked questions
Is dye penetrant testing the same as liquid penetrant inspection? Yes. Dye penetrant testing (DPT), liquid penetrant inspection (LPI), liquid penetrant testing and PT all refer to the same NDT method.
How long should the penetrant dwell time be? A minimum of 10 minutes is the generally accepted guideline for most applications. Fine or tight cracks, or work in cold conditions, may need longer. Always follow the product data sheet and any specified procedure.
Can dye penetrant testing find cracks below the surface? No. It only detects flaws that are open to the surface. For subsurface defects, use ultrasonic testing, radiography or, on ferromagnetic steels, magnetic particle testing.
Can I use dye penetrant on stainless steel and aluminium? Yes. It works on most non-porous metals. Spotcheck SKD-S2 developer is non-halogenated and suitable for stainless steel, aluminium, magnesium and titanium.
Can I use dye penetrant on plastic? Solvent-based penetrants such as SKL-SP2 are not recommended on plastics, because they can stain, soften or dissolve the material.
Do I need to be certified to do dye penetrant testing? For routine maintenance checks, a trained technician following the kit instructions can screen parts. For code-governed, aerospace or safety-critical inspections, the work should be done by certified NDT personnel to the required standard.
Do I need to clean the part after testing before I repair it? Yes. Remove all developer and penetrant residue with a solvent cleaner such as SKC-S. Residue can stop epoxy putties and coatings from bonding properly and can contaminate welds.
Leave a comment
All comments are moderated before being published.
This site is protected by reCAPTCHA and the Google Privacy Policy and Terms of Service apply.